Last year, I dove into the world of ergonomic keyboards, after experiencing pain and discomfort from typing long hours on my Keychron K12. After a lot of research on the plethora of options out there, I went with the ZSA Moonlander. It's an insane looking keyboard, but ZSA's website did a good job convincing me to give it a shot. It's a significant investment into a keyboard, but it's one I was willing to make given just how much time I spend at my computer and ZSA's longevity claims for their keyboards.
So how's the experience of using a split keyboard? In a word, amazing. It wasn't easy, but I'm glad I made the switch. The first 2 weeks with the Moonlander were the worst part of the transition. For the first few months, I used both the Moonlander and my K12 on my desk just to maintain a reasonable level of productivity. ZSA offers tools to train yourself on their keyboards, and I spent a lot of time in their typing tests to get used to the Moonlander's feel. Here's a picture of my initial setup with the Moonlander (it's actually a newer photo where I'm using the Moonlander at a steeper angle using the tenting kit, but you get the idea).
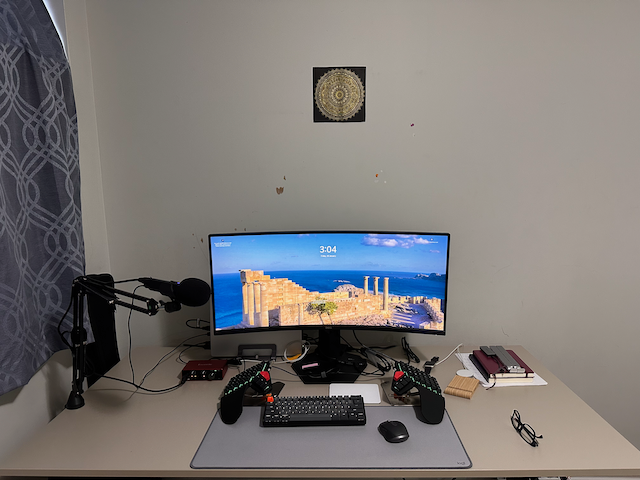
I was WFH full-time back then, so I set a rule for myself: until I got comfortable using the Moonlander, I'd use a "normal" keyboard (the K12) when at work, and switch to the Moonlander when on my personal machine. This rule helped me immensely in gradually getting used to the Moonlander. I was free to experiment with different positions and angles for the keyboard, without affecting my work. It also allowed me to temporarily switch to the Moonlander whenever I felt discomfort from typing on the K12.
Over time, I was able to fully switch over to the Moonlander for my work too, allowing me to finally put the K12 away. All this time, I was still using the default keyboard layout that came pre-configured with the Moonlander. But now that I was comfortable with the hardware, it was time to dive into the software.
One of the biggest selling points of the Moonlander is its configurability. ZSA provides a tool called the Oryx that lets you change the layout of the keys on the keyboard (ZSA's keyboards use the QMK firmware, Oryx is just the UI layer for it). It's why I love my Moonlander, and where I feel I start to unlock its full potential. As I mentioned earlier, for the first few months, I used the Moonlander's default layout. I also learned to touch type during this time, resulting in a much more comfortable typing experience along with improved posture.
Switching to Colemak
Finally, it was time to look into alternate keyboard layouts. This particular rabbit hole goes deep! My research began with popular alternatives to QWERTY and what the pros and cons were for each one. Ultimately, I decided to try the Colemak layout. The resources on their website helped me understand not only the rationale behind using Colemak, it also provided with resources on how I could implement it on my Moonlander. Since I was using the Moonlander exclusively, I decided to start slow and only change the letters, keeping the modifiers in their default locations. This still posed a real challenge, since I was undoing 2 decades of QWERTY. I printed out a screenshot of the Colemak layout and taped it to my monitor, so I wouldn't have to constantly look down.
And so went the next few months. At this point, I'd been using the Moonlander as my only keyboard for almost 6 months. While my typing experience was considerably improved, I was still having to contort my hands in all sorts of ways to hit modifier keys. That was the next thing I addressed.
Layers & Home Row Mods
So far, I'd intentionally kept things simple. Switching to the Moonlander has been an extremely high-risk high-reward strategy. However, once I got used to the base colemak layout, I decided to take the next step and delve into layers and home-row mods. For those unfamiliar with the concept of layers, when you press the Shift key on your keyboard, it goes into the CAPS and symbols layer. Mods on the other hand, is short for modifiers which are your Ctrl, Alt/Opt, Win/Cmd/Meta keys. Shift is also a modifier. Home-row mods means these modifier keys are on the keyboard's "home row", i.e. the middle row where your fingers would rest if you're touch typing. Oryx (and by extension QMK/ZMK) allow for a number of layers on your keyboard which let you trigger specific letters, symbols, numbers, Fn keys, and even macros. With that in mind, I set out to find a layout that I could use as a starting point. I learned about Miryoku, a 36-key layout based on a modified version of colemak called colemak mod-dh, and Seniply, a 34-key layout again based on colemak mod-dh. I ran with both of these for about 2 weeks each, and decided to keep working with Seniply. It has a staggeringly low number of keys (only 34!), but I loved its implementation of home-row mods using mod-tap keys, and wanted to see how I could adapt to it.
Current Layout
And that brings me to my current layout. As much as I love Seniply, I realized I needed my numbers on the first layer, next to my letters, along with easier access to my Fn keys. So with that in mind, I set out to create my layout.
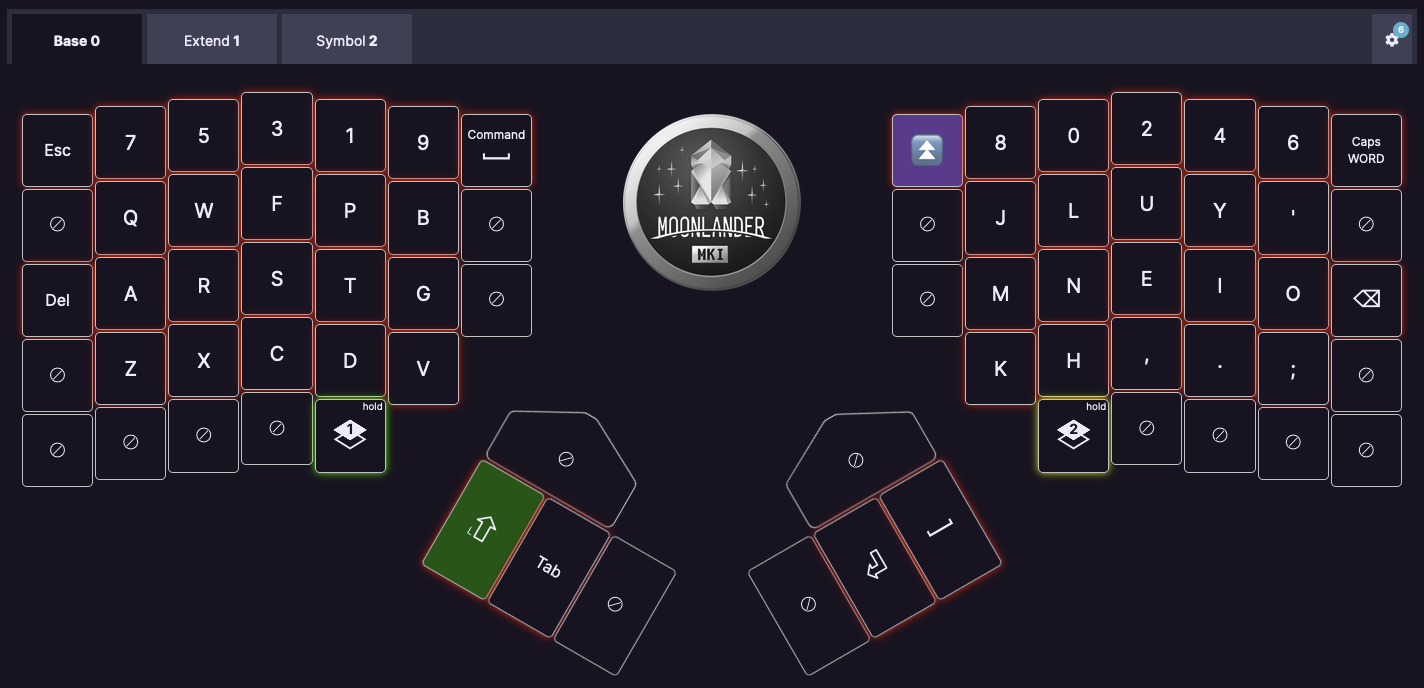
This is the base layer. It's using colemak-dh for the letters, but the numbers are a variation on the dvorak layout. I've also peppered in some useful shortcuts I access often. The Shift, Tab, Space, and Enter keys are on the thumbs, with Delete and Backspace on both ends of the keyboard.
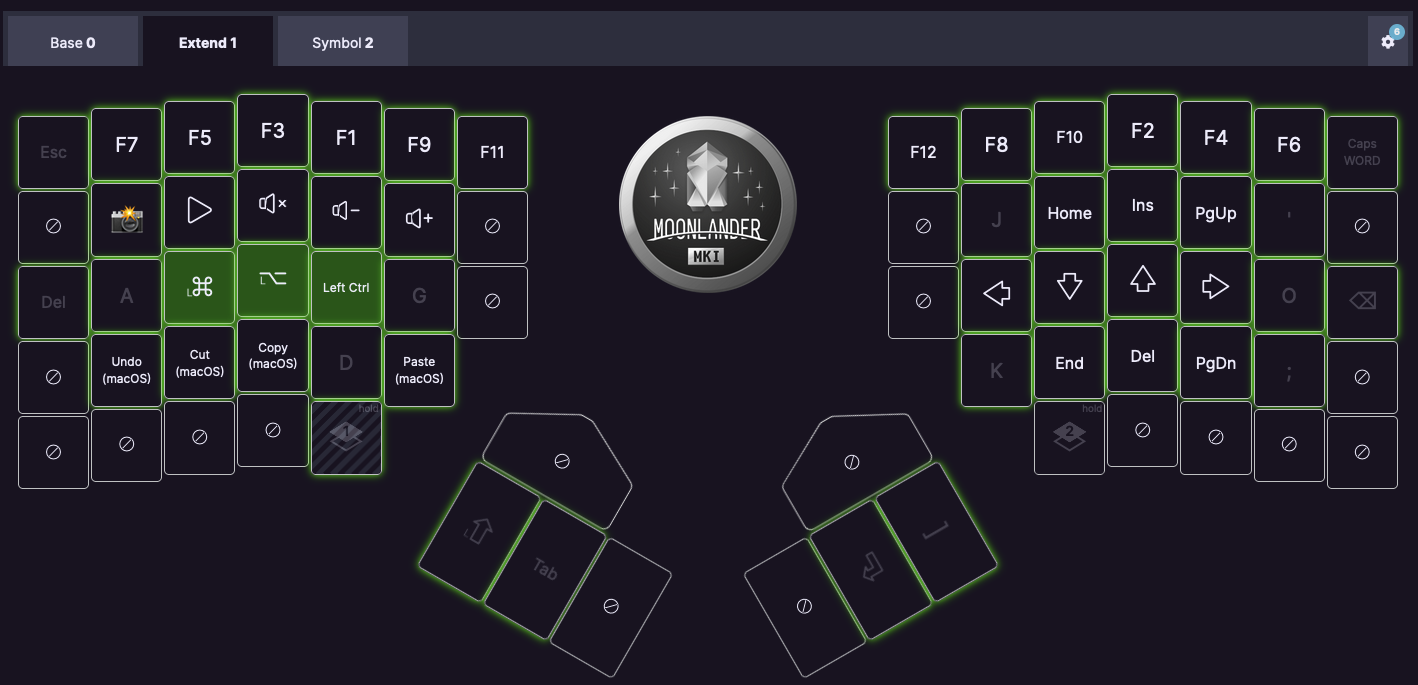
This is the "extend" layout. I borrowed the idea from miryoku and seniply and modified it a bit. The home row has modifiers on the left side and arrow keys on the right. I went with the "vim" layout as it's intuitive when navigating code (which is where most of my arrow key usage happens). I also have the copy, paste, cut and undo shortcuts on this layer, so I can access them with no more than 2 key presses. This layer also has the Fn keys that follow the same layout as the numbers on the base layout, with F11 and F12 on the inner edge of each side.
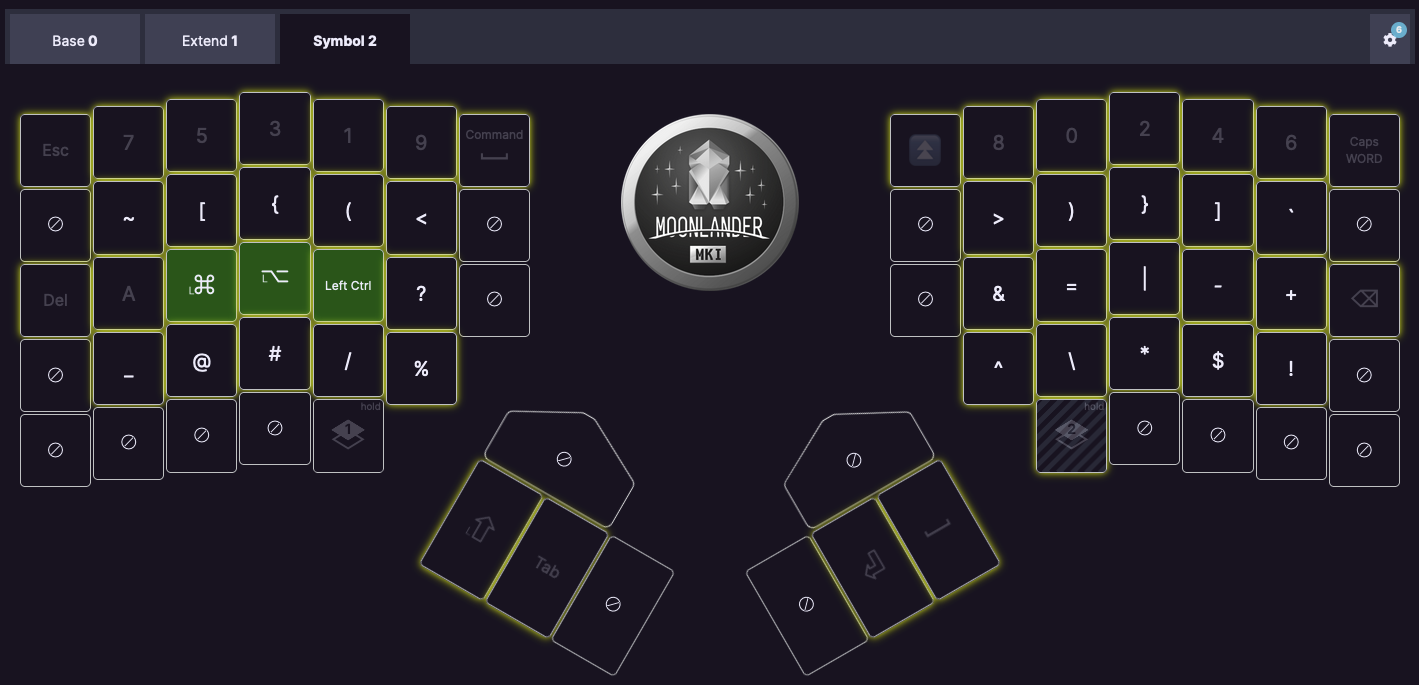
And finally, I have the symbol layout. I spend most of my time working with .NET, React and React Native, so I've arranged the symbols such that they're easy to access. I'm not fully satisfied with this layer yet, so I'm watching my typing heatmap using ZSA's keymapp app to track which symbols I access the most often. I'll update the layout once I have enough data to make a decision.
Conclusion
So after all that, how much did my typing experience actually improve? I'd say it's substantially better. The pain in my arms and wrists is gone, my posture's improved, and I can finally touch type without having to look at the keyboard. I'm so comfortable with this keyboard now that I've switched to blank keycaps. It's a fun conversation starter at the office now; people come up to me to introduce themselves and ask about the keyboard. 😃